![]()
- Description
- Why?
- How it works
- File naming convention
- Animation metadata (CSV)
- Requirements
- Installation
- Demo
- Usage
- Issues
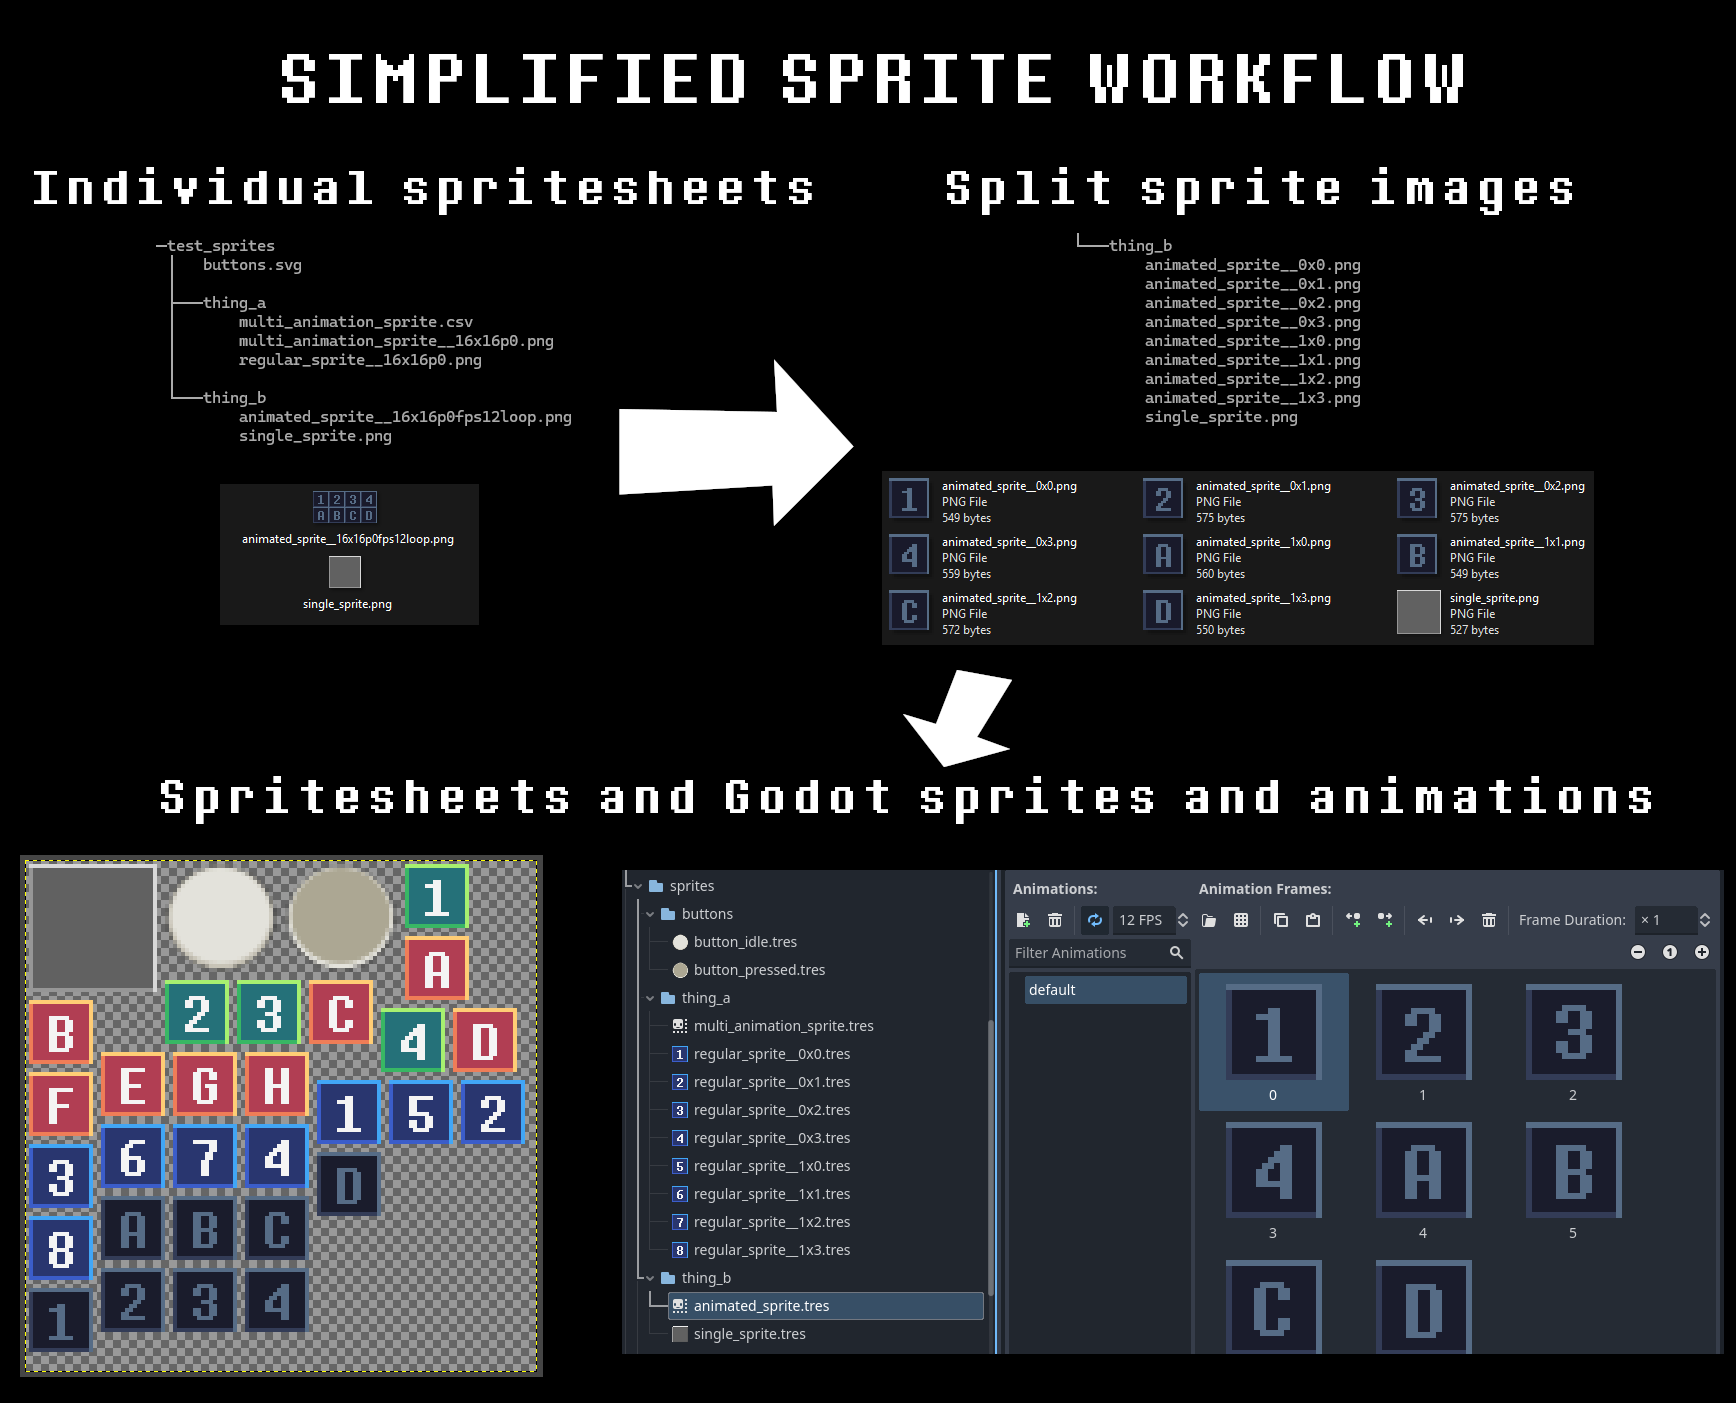
Godot Universal SpritePacker is a Python tool that converts individual images, tilesets, and SVG layers into optimized spritesheets and ready-to-use Godot .tres resources:
- AtlasTextures for single sprites
- SpriteFrames for animations
It intelligently splits, trims and packs images or vector layers into one or more texture atlases, preserving your folder structure and optionally generating PixiJS-compatible .json files or native Godot resources. View PixiJS example spritesheet
I've used TexturePacker for years and still think it’s a great option if you need the full range of features it provides. But over time, I realized I didn’t actually need most of them. I had already written custom importers for its metadata formats in my own retro JavaScript games, and the actual task of packing sprites turned out to be straightforward thanks to the excellent rectpack module.
This led me to build the first version of this tool (originally called smart_splitter), focused on a workflow where sprites and tilesets are kept as individual files and automatically packed into spritesheets based on their filename and folder structure. For example, an animated sprite called player__32x32.png would be treated as multiple sprites in one image. That setup made iteration super convenient. Later, as I started using Godot more, I extended the tool to export native .tres resources as well.
I also occasionally needed to export UI icons directly from vector files, making it easy to go from vector artwork to in-game assets. For example, I used a single SVG with this packer when creating the icons for Canvas Draw 2D, turning updates into a single-click task.
I hope this tool helps simplify your 2D asset workflow too!
The tool follows these steps:
- Scans the specified
source_directory(and subdirectories) for images files ('.png','.bmp','.jpg','.jpeg') and vector files (.svg). - Parses filenames to detect optional suffixes indicating tile size, frame rate, padding, etc.
- Splits images into individual sprites based on the specified tile size.
- If the file is an SVG, each layer is exported as a separate sprite using Inkscape.
- Optionally checks for the existence of a
.csvfile with multiple animation definitions for a single image. - Optionally saves individual sprite images to the
image_directory. - Optionally trims transparent spaces from the sprites.
- Packs sprites into one or more optimized spritesheets (texture atlases).
- Generates metadata files:
- (a) PixiJS-compatible
.json - (b) Godot 4 AtlasTexture
.tresfiles - (c) Godot 4 SpriteFrames
.tresfiles (for animations)
- (a) PixiJS-compatible
Files should be named according to this pattern:
boss_turret__WxH[pN][fpsN][loop]
background.png- Treats the entire image as one sprite.hero__32x32.png- Splits the image into multiple 32x32 sprites.Small Spider__64x64p2fps12loop.png- 64×64 sprite with 2px padding, 12 FPS animation, looping
| Field | Description |
|---|---|
name |
Sprite or animation name. |
W x H |
Tile width × height in pixels. |
pN |
(optional) Padding between tiles (e.g., p2 = 2px). |
fpsN |
(optional) Frame rate in frames per second (e.g., fps12). |
loop |
(optional) If present, marks the animation as looping. |
If the source file is located inside a subfolder, the relative path is included in the sprite's name (e.g., enemies/boss__64x64.png).
Sprites are named using the format subfolder_a/subfolder_b/original_name__RxC, where R is the row index and C is the column index. Rows and columns are intentionally inverted from standard grid notation so that alphabetical sorting orders sprites left to right.
Note: SVG files are always exported as individual sprites based on layer and the pixel resolution defined in the file. The filename is ignored.
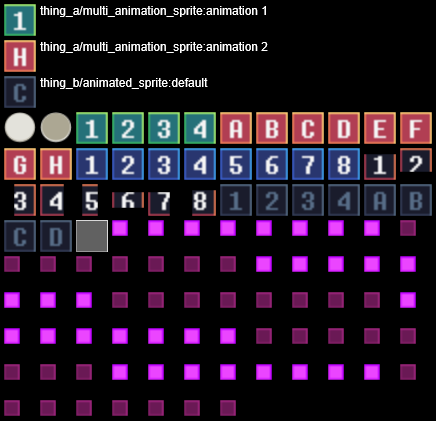
You can define multiple animations using a .csv file with the same base name as the image. When present, the CSV defines all frames for the corresponding SpriteFrames resource, and any unused sprites from the original image are discarded.
Animation data is also saved in the .json spritesheet file as both animations (recognised by PixiJS) and in the meta field. The animation name is image_name:animation_name. When multiple spritesheets are exported, all animation data is stored within each individual spritesheet.
name; start_x; start_y; count_x; count_y; fps; loop
Walk;       0;       0;       4;       1;  12; true
Jump;       0;       1;       4;       1;  12; false
| Field | Description |
|---|---|
name |
Animation name (as seen in Godot). |
start_x |
Starting tile column. |
start_y |
Starting tile row. |
count_x |
Number of columns in the animation. |
count_y |
Number of rows in the animation. |
fps |
Playback speed (frames per second). |
loop |
Whether the animation should loop (true/false). |
- Python 3.9+
- Inkscape (optional, for SVG layer processing)
If Inkscape is not installed at the default path, set it manually using
--inkscape_path. - Requires the Pillow and rectpack modules.
You can install the tool from PyPI or directly from GitHub. This installs a command-line tool called godot_universal_spritepacker:
pip install godot-universal-spritepackeror
pip install git+https://github.com/Donitzo/godot-universal-spritepacker.gitAlternatively, you can simply download the script and run it directly:
python src/godot_universal_spritepacker/godot_universal_spritepacker.pyThere is a set of sprites in the sample directory. Try converting them using one of the two .bat files to get an idea how the tool works. One of the files generates multiple spritesheets.
Inside the pre-made ./sample/output directory, there is a simple PixiJS demo page for rendering the contents of the pre-compiled spritesheet. To test the PixiJS demo locally, serve it using a simple HTTP server.
Run the tool with:
godot_universal_spritepacker --source_directory <source_dir> --spritesheet_path <output_path> [options]| Argument | Description |
|---|---|
--source_directory |
Directory containing source images. |
--spritesheet_path |
Output path (without extension) for the spritesheet(s). |
| Argument | Description |
|---|---|
--save_json |
If set, saves PixiJS spritesheet .json files with sprite frames. |
--image_directory |
Directory to save individual sprite images before packing. |
--godot_sprites_directory |
Directory to output Godot .tres resource files. |
--godot_resource_directory |
Internal Godot resource directory for spritesheets (default: res://textures/). |
--inkscape_path |
Custom path to the Inkscape executable for SVG processing. |
--max_spritesheet_size |
Maximum width/height for each spritesheet (default: 4096). |
--sprite_padding |
Transparent pixels around each sprite. Default is 1 = 2 pixel total gap. |
--disable_trimming |
If set, disables sprite transparency trimming. |
--min_trim_margin |
The minimum margin to keep after trimming sprites (good for edge effects). |
--default_framerate |
If set, treats all regular sprites as animations with this framerate. |
Please report any bugs, feature requests, or questions in the Issues section.